
先跑一跑
论文看了有一些了,接下来必须动手干活。首先想到的就是科研传统手艺——复现。我比较想要复现Mask R-CNN这一篇。
在自己写(其实我是希望网络本身也手搓,但是还是要一步一步来)之前,首先想要先跑一跑写好的代码和与训练模型来对Mask R-CNN有一个感性认识。
我首先尝试的是直接运行论文提供的代码,然而毕竟是七年前的工作,使用的环境过于古老,再加上难绷的Caffe,我没有成功运行这个项目。
不过还好找到了一个比较新而且配置更简明的版本,只需要跟着它的教程来配就可以了。我使用的是python 3.6虚拟环境。不过它的requirements.txt写得过于宽松,在配置包的时候会下载很新的包导致依赖上的问题。我把requirements.txt修改成了这样:
numpy
scipy
Pillow
cython
matplotlib
scikit-image
tensorflow==1.13.1
keras==2.0.8
opencv-python==3.4.13.47
h5py==2.10.0
imgaug
IPython[all]
这样就不会出问题了。不过也可以发现这个版本使用的是tensorflow,不过不用着急,我打算接下来就用pytorch来重新实现它。
该项目仓库release处提供的预训练模型直接放在项目根目录就可以。
因为我们要用coco训练级,所以还需要安装pycocotools,不再赘述。
运行 samples/demo.ipynb ,效果是这样的:
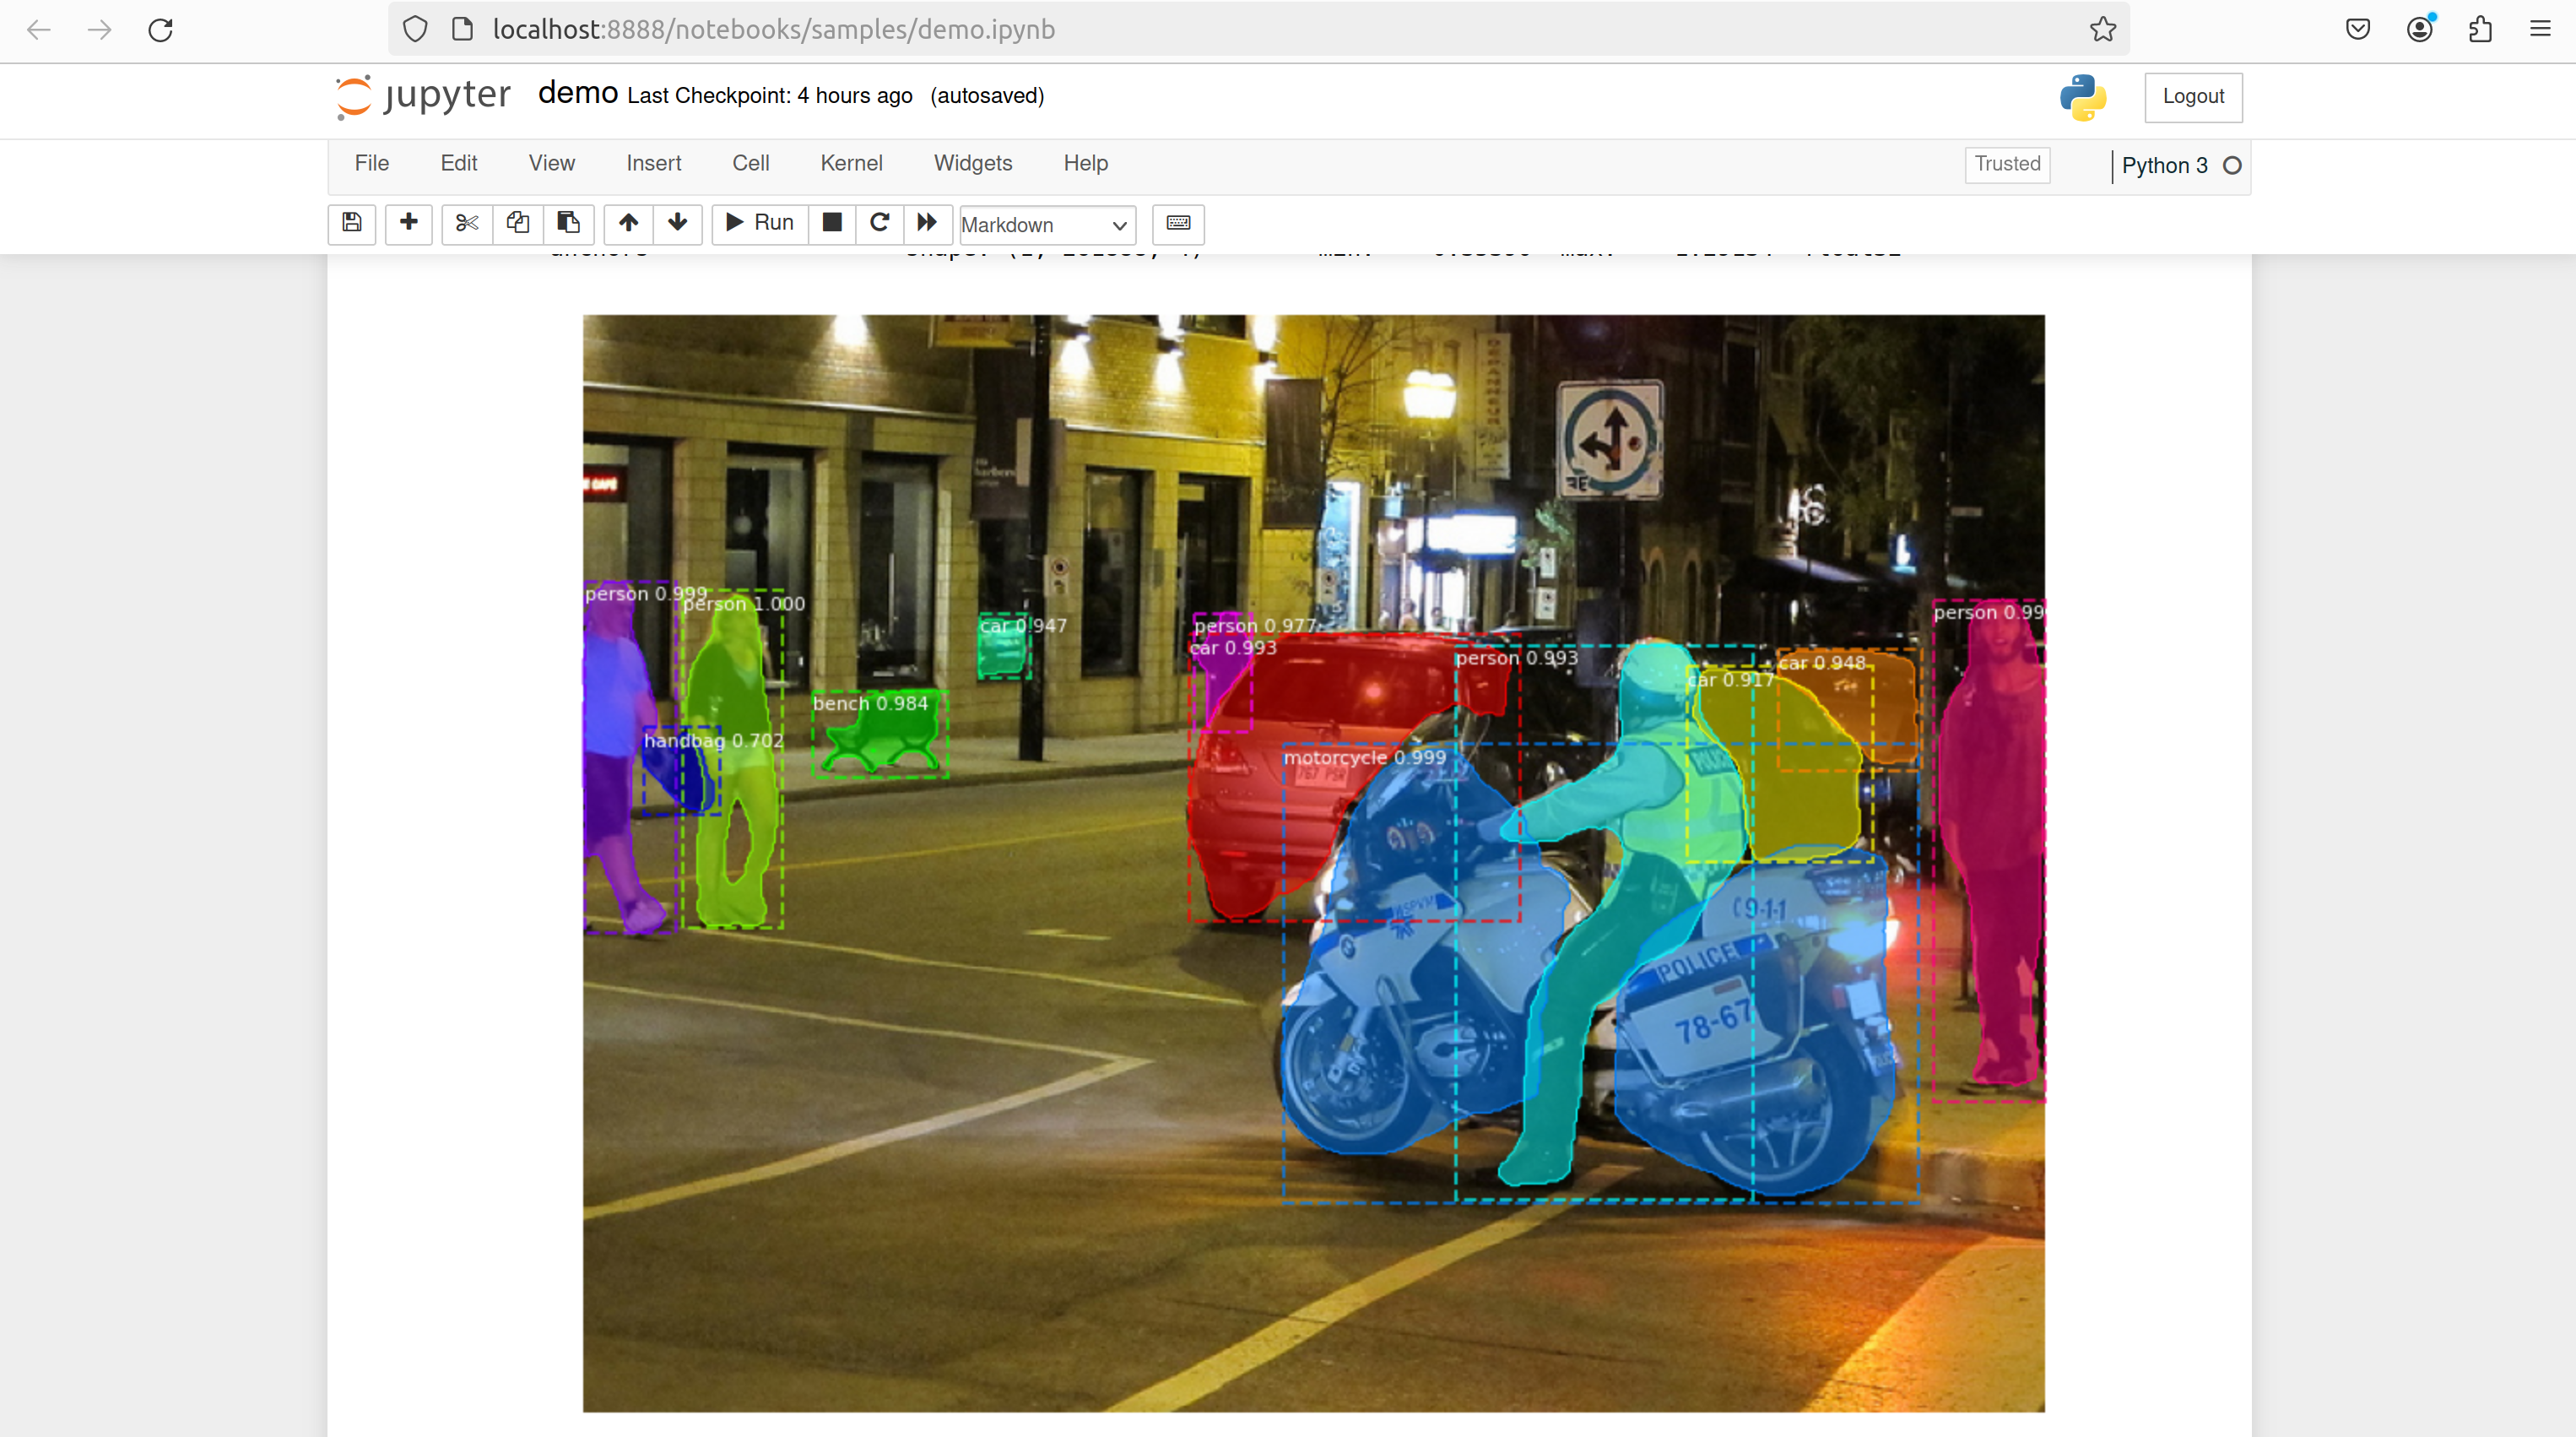
效果还是非常美丽的。七八年前就已经有这样的技术了,令人感叹。当然只是跑通代码完全没有用,接下来尝试用 pytorch 来复现它。(注意,这里并没有网络本身的复现,只是熟悉pytorch使用的练习代码)
再写一写
pytorch 官方教程给了一个使用Faster/Mask R-CNN实现行人检测的例子。
由于原教程已经十分详尽,我在这里仅进行转载和注解。
Defining the Dataset
The reference scripts for training object detection, instance segmentation and person keypoint detection allows for easily supporting adding new custom datasets. The dataset should inherit from the standard torch.utils.data.Dataset class, and implement __len__ and __getitem__.
这里定义Dataset类。由于我们的目标是做有bounding box和mask的目标识别,所以对于dataset里的每个对象,要素是多元组。
The only specificity that we require is that the dataset __getitem__ should return a tuple:
-
image: torchvision.tv_tensors.Image of shape [3, H, W], a pure tensor, or a PIL Image of size (H, W) (图像本身)
-
target: a dict containing the following fields
-
boxes, torchvision.tv_tensors.BoundingBoxes of shape [N, 4]: the coordinates of the N bounding boxes in [x0, y0, x1, y1] format, ranging from 0 to W and 0 to H (所有可识别目标的bounding box)
-
labels, integer torch.Tensor of shape [N]: the label for each bounding box. 0 represents always the background class. (所有可识别目标的分类结果)
-
image_id, int: an image identifier. It should be unique between all the images in the dataset, and is used during evaluation. (图片的id,标识属性)
-
area, float torch.Tensor of shape [N]: the area of the bounding box. This is used during evaluation with the COCO metric, to separate the metric scores between small, medium and large boxes. (bounding box的面积,为了基于大小进行分类)
-
iscrowd, uint8 torch.Tensor of shape [N]: instances with iscrowd=True will be ignored during evaluation. (crowd标识。似乎不对标记为crowd的图像进行处理?)
-
(optionally) masks, torchvision.tv_tensors.Mask of shape [N, H, W]: the segmentation masks for each one of the objects (可识别目标掩码)
-
If your dataset is compliant with above requirements then it will work for both training and evaluation codes from the reference script. Evaluation code will use scripts from pycocotools which can be installed with pip install pycocotools.
在evaluation部分,还是要用到coco数据集。所以还是要配置pycocotools。
One note on the labels. The model considers class 0 as background. If your dataset does not contain the background class, you should not have 0 in your labels. For example, assuming you have just two classes, cat and dog, you can define 1 (not 0) to represent cats and 2 to represent dogs. So, for instance, if one of the images has both classes, your labels tensor should look like [1, 2].
这里是label的约定。它按照可识别目标bounding box的顺序来标识识别结果。
Additionally, if you want to use aspect ratio grouping during training (so that each batch only contains images with similar aspect ratios), then it is recommended to also implement a get_height_and_width method, which returns the height and the width of the image. If this method is not provided, we query all elements of the dataset via __getitem__ , which loads the image in memory and is slower than if a custom method is provided.
Aspect ratio grouping 是一个可以选择的优化方法。它将宽高比相近的图像尽量放在同一个batch里来加速训练。如果这样的话,建议添加一个函数来专门获取图片的宽和高。
PennFudan 数据集下载
下载命令如下:
wget https://www.cis.upenn.edu/~jshi/ped_html/PennFudanPed.zip -P data
cd data && unzip PennFudanPed.zip
下载后可以发现文件夹是这样组织的:
PennFudanPed/
  PedMasks/
    FudanPed00001_mask.png
    FudanPed00002_mask.png
    FudanPed00003_mask.png
    FudanPed00004_mask.png
    ...
  PNGImages/
    FudanPed00001.png
    FudanPed00002.png
    FudanPed00003.png
    FudanPed00004.png
可以用 matplotlib 看一看数据集里图片和掩码图(Mask)的对应关系,示例程序如下:
import matplotlib.pyplot as plt
from torchvision.io import read_image

image = read_image("data/PennFudanPed/PNGImages/FudanPed00016.png")
mask = read_image("data/PennFudanPed/PedMasks/FudanPed00016_mask.png")

plt.figure(figsize=(16, 8))
plt.subplot(121)
plt.title("Image")
# Matplotlib 希望通道是图像张量的最后一个维度(而在 PyTorch 中它们是第一个维度) ,
# 因此我们将使用.permute方法把通道移动到图像的最后一个维度。
# 另注:opencv 里图像的存储为 BGR 格式,刚好和现在流行的 RGB 反过来了。虽然这里不涉及,以后可能要注意一下。
plt.imshow(image.permute(1, 2, 0))
plt.subplot(122)
plt.title("Mask")
plt.imshow(mask.permute(1, 2, 0))
plt.show()
运行之后可以看到这样的画面:
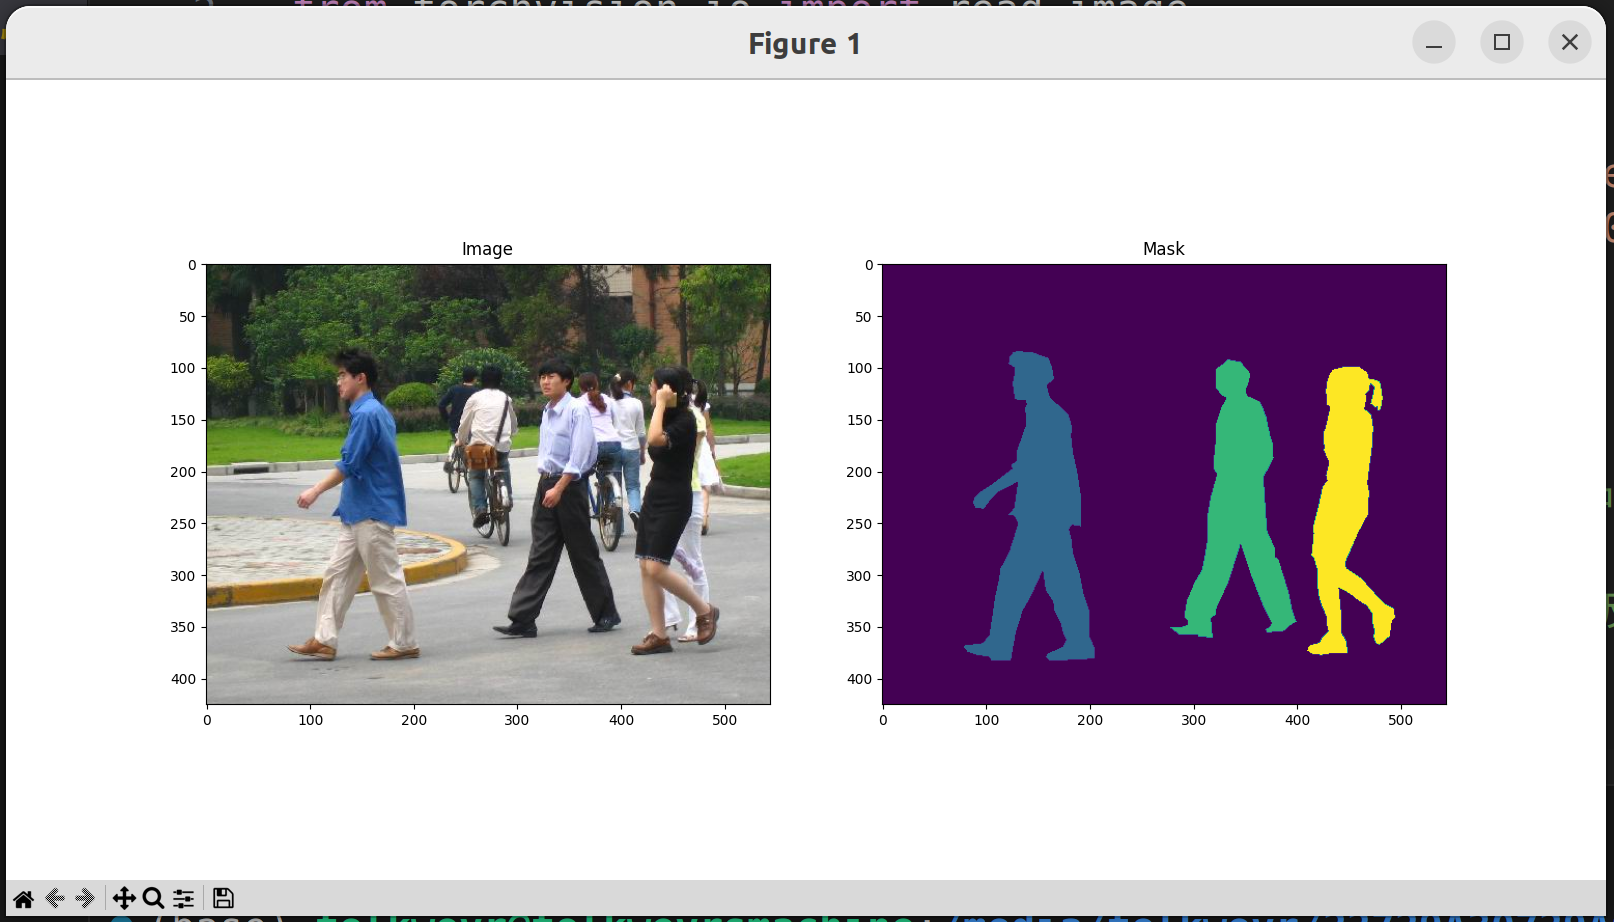
右边就是我们将要为之奋斗的识别结果了。
数据集处理
So each image has a corresponding segmentation mask, where each color correspond to a different instance. Let’s write a torch.utils.data.Dataset class for this dataset. In the code below, we are wrapping images, bounding boxes and masks into torchvision.tv_tensors.TVTensor classes so that we will be able to apply torchvision built-in transformations (new Transforms API) for the given object detection and segmentation task. Namely, image tensors will be wrapped by torchvision.tv_tensors.Image, bounding boxes into torchvision.tv_tensors.BoundingBoxes and masks into torchvision.tv_tensors.Mask. As torchvision.tv_tensors.TVTensor are torch.Tensor subclasses, wrapped objects are also tensors and inherit the plain torch.Tensor API. For more information about torchvision tv_tensors see this documentation.
这里是说pytorch专门为了cv工作实现了一个继承tensor类的子类——tv_tensors,里面有一些方便我们使用的成员,例如Image、BoundingBoxes、Masks。我们在定义__get_item__和__len__的时候可以直接引用它们。
import os
import torch

from torchvision.io import read_image
from torchvision.ops.boxes import masks_to_boxes
from torchvision import tv_tensors
from torchvision.transforms.v2 import functional as F


class PennFudanDataset(torch.utils.data.Dataset):
    def __init__(self, root, transforms):
        # 这里的transforms是torchvision.transforms v2类变换操作,用于增广(augment)图像数据,之后会用到。
        # 文档:https://pytorch.org/vision/stable/transforms.html
        self.root = root
        self.transforms = transforms
        # load all image files, sorting them to
        # ensure that they are aligned
        self.imgs = list(sorted(os.listdir(os.path.join(root, "PNGImages"))))
        self.masks = list(sorted(os.listdir(os.path.join(root, "PedMasks"))))
        # 初始化原图片和掩码图片列表

    def __getitem__(self, idx):
        # load images and masks
        img_path = os.path.join(self.root, "PNGImages", self.imgs[idx])
        mask_path = os.path.join(self.root, "PedMasks", self.masks[idx])
        img = read_image(img_path)
        mask = read_image(mask_path)
        # instances are encoded as different colors
        # 使用unique提取不同的颜色来获取目标物体的数量(id)
        obj_ids = torch.unique(mask)
        # first id is the background, so remove it
        obj_ids = obj_ids[1:]
        num_objs = len(obj_ids)

        # split the color-encoded mask into a set
        # of binary masks
        # 获得每一个目标的二值mask
        masks = (mask == obj_ids[:, None, None]).to(dtype=torch.uint8)

        # get bounding box coordinates for each mask
        # 调用api生成box
        boxes = masks_to_boxes(masks)

        # there is only one class
        # 由于这个数据集里只识别行人,所以只有一种识别结果...
        labels = torch.ones((num_objs,), dtype=torch.int64)

        # 计算面积
        image_id = idx
        area = (boxes[:, 3] - boxes[:, 1]) * (boxes[:, 2] - boxes[:, 0])
        # suppose all instances are not crowd
        iscrowd = torch.zeros((num_objs,), dtype=torch.int64)

        # 类型转换
        # Wrap sample and targets into torchvision tv_tensors:
        img = tv_tensors.Image(img)

        # 声明Dict
        target = {}
        target["boxes"] = tv_tensors.BoundingBoxes(boxes, format="XYXY", canvas_size=F.get_size(img))
        target["masks"] = tv_tensors.Mask(masks)
        target["labels"] = labels
        target["image_id"] = image_id
        target["area"] = area
        target["iscrowd"] = iscrowd

        if self.transforms is not None:
            img, target = self.transforms(img, target)

        return img, target

    def __len__(self):
        # 返回数据集size
        return len(self.imgs)
数据集处理到此为止了。
定义模型
官方教程里用的是Faster R-CNN和Mask R-CNN。我就不多做介绍了,往期笔记里介绍过了。
There are two common situations where one might want to modify one of the available models in TorchVision Model Zoo. The first is when we want to start from a pre-trained model, and just finetune the last layer. The other is when we want to replace the backbone of the model with a different one (for faster predictions, for example).
有两种使用模型的方式,第一种是对已有的与训练模型进行微调,第二种是对已有的模型更换backbone。
Let’s go see how we would do one or another in the following sections.
预训练模型微调
比如从COCO里下载FasterRCNN
import torchvision
from torchvision.models.detection.faster_rcnn import FastRCNNPredictor

# load a model pre-trained on COCO
model = torchvision.models.detection.fasterrcnn_resnet50_fpn(weights="DEFAULT")

# replace the classifier with a new one, that has
# num_classes which is user-defined
num_classes = 2  # 1 class (person) + background
# 因为只有背景和行人两类,所以class只有两个
# get number of input features for the classifier
# 获取模型的分类器输入的特征图的维度
in_features = model.roi_heads.box_predictor.cls_score.in_features
# replace the pre-trained head with a new one
# 将predictor更换为我们需要的
model.roi_heads.box_predictor = FastRCNNPredictor(in_features, num_classes)
修改模型,更换backbone
import torchvision
from torchvision.models.detection import FasterRCNN
from torchvision.models.detection.rpn import AnchorGenerator

# load a pre-trained model for classification and return
# only the features
# mobilenet_v2的资料在这里:https://pytorch.org/hub/pytorch_vision_mobilenet_v2/
# 我们在这里只用它提取特征的部分,不用后面的分类器。
backbone = torchvision.models.mobilenet_v2(weights="DEFAULT").features
# ``FasterRCNN`` needs to know the number of
# output channels in a backbone. For mobilenet_v2, it's 1280
# so we need to add it here
backbone.out_channels = 1280
# 通道数某种意义上可以理解成特征图的数量。实际上是很多特征图合成一个大特征图,channel是多层特征图的层数维。
# 一个有意思的链接,关于多层特征图的卷积核:https://cloud.tencent.com/developer/news/323068

# let's make the RPN generate 5 x 3 anchors per spatial
# location, with 5 different sizes and 3 different aspect
# ratios. We have a Tuple[Tuple[int]] because each feature
# map could potentially have different sizes and
# aspect ratios
# 众所周知,Mask RCNN原论文的Anchor每个位置生成九个,3 x 3。
# 这也是可以修改的。
anchor_generator = AnchorGenerator(
    sizes=((32, 64, 128, 256, 512),),
    aspect_ratios=((0.5, 1.0, 2.0),)
)

# let's define what are the feature maps that we will
# use to perform the region of interest cropping, as well as
# the size of the crop after rescaling.
# if your backbone returns a Tensor, featmap_names is expected to
# be [0]. More generally, the backbone should return an
# ``OrderedDict[Tensor]``, and in ``featmap_names`` you can choose which
# feature maps to use.
roi_pooler = torchvision.ops.MultiScaleRoIAlign(
    featmap_names=['0'], # 池化使用的特征图
    output_size=7, # 见下
    sampling_ratio=2 # 见下
)

# output_size (int or Tuple[int, int]) – 输出大小,用 (height, width) 表示。
# spatial_scale (float) – 将输入坐标映射到框坐标的比例因子。默认值1.0。
# sampling_ratio (int) – 插值网格中用于计算每个合并输出bin的输出值的采样点数目。
# 如果 > 0,则恰好使用sampling_ratio x sampling_ratio网格点。
# 如果 <= 0,则使用自适应数量的网格点(计算为cell (roi_width / pooled_w),同样计算高度)。
# 默认值1。

# put the pieces together inside a Faster-RCNN model
# 魔改大成
model = FasterRCNN(
    backbone,
    num_classes=2,
    rpn_anchor_generator=anchor_generator,
    box_roi_pool=roi_pooler
)
Object detection and instance segmentation model for PennFudan Dataset
这里针对我们的数据集进行操作。由于数据集太小,采用微调。
In our case, we want to finetune from a pre-trained model, given that our dataset is very small, so we will be following approach number 1.
Here we want to also compute the instance segmentation masks, so we will be using Mask R-CNN:
import torchvision
from torchvision.models.detection.faster_rcnn import FastRCNNPredictor
from torchvision.models.detection.mask_rcnn import MaskRCNNPredictor


def get_model_instance_segmentation(num_classes):
    # 以下配置Faster RCNN
    # load an instance segmentation model pre-trained on COCO
    model = torchvision.models.detection.maskrcnn_resnet50_fpn(weights="DEFAULT")

    # get number of input features for the classifier
    in_features = model.roi_heads.box_predictor.cls_score.in_features
    # replace the pre-trained head with a new one
    model.roi_heads.box_predictor = FastRCNNPredictor(in_features, num_classes)

    # 以下配置Mask RCNN
    # now get the number of input features for the mask classifier
    in_features_mask = model.roi_heads.mask_predictor.conv5_mask.in_channels
    hidden_layer = 256
    # and replace the mask predictor with a new one
    model.roi_heads.mask_predictor = MaskRCNNPredictor(
        in_features_mask,
        hidden_layer,
        num_classes
    )

    return model
Putting everything together
根据官网指示,我们下载一些实用性脚本。
In references/detection/, we have a number of helper functions to simplify training and evaluating detection models. Here, we will use references/detection/engine.py and references/detection/utils.py. Just download everything under references/detection to your folder and use them here. On Linux if you have wget, you can download them using below commands:
os.system("wget https://raw.githubusercontent.com/pytorch/vision/main/references/detection/engine.py")
os.system("wget https://raw.githubusercontent.com/pytorch/vision/main/references/detection/utils.py")
os.system("wget https://raw.githubusercontent.com/pytorch/vision/main/references/detection/coco_utils.py")
os.system("wget https://raw.githubusercontent.com/pytorch/vision/main/references/detection/coco_eval.py")
os.system("wget https://raw.githubusercontent.com/pytorch/vision/main/references/detection/transforms.py")
我是直接在终端里用wget下载了。
编写增广数据集用函数
Since v0.15.0 torchvision provides new Transforms API to easily write data augmentation pipelines for Object Detection and Segmentation tasks.
这里写一个get_transform函数来随机变换图像。具体请阅读 Transforms API 文档。
Let’s write some helper functions for data augmentation / transformation:
from torchvision.transforms import v2 as T


def get_transform(train):
    transforms = []
    if train:
        transforms.append(T.RandomHorizontalFlip(0.5))
    transforms.append(T.ToDtype(torch.float, scale=True))
    transforms.append(T.ToPureTensor())
    return T.Compose(transforms)
Evaluate Default Model (Test forward())
这里主要是用输出验证一下默认网络是怎么训练和推理的。这里的网络是已经预训练完成的了。在此之前先转载一下Dataloader的完整写法和参数:
示例:
data.DataLoader(
dataset,
batch_size=1,
shuffle=False,
sample=None,
batch_sample=None,
num_workers=0,
collate_fn=<function default_collate at 0x7f108ee01620>,
pin_memory=False,
drop_last=False,
timeout=0,
worker_init_fn=None
)
参数介绍:
dataset:加载的数据集
batch_size:批大小
shuffle:是否将数据打乱
sample:样本抽样
batch_sample:
num_workers:使用多进程加载的进程数,0代表不使用多进程
collate_fn:如何将多个样本数据拼接成一个batch,一般使用默认的拼接方法即可
pin_memory:是否将数据保存在pin memory区,pin memory中的数据转到GPU会快一些
drop_last:dataset中的数据个数可能不是batch_size的整数倍,drop_last为True会将多出来不足一个的batch的数据丢弃
timeout:
worker_init_fn:
回到pytorch教程这边来。
Before iterating over the dataset, it’s good to see what the model expects during training and inference time on sample data.
其实这段代码只是让你看看输出长什么样,实际上去看模型本身的文档也可以,不过这样更直观、信息更详细。
import torch
import torchvision
from torchvision.models.detection.faster_rcnn import FastRCNNPredictor
from torchvision.models.detection.mask_rcnn import MaskRCNNPredictor
import utils
import mydataset
from mydataset import PennFudanDataset, get_transform

model = torchvision.models.detection.fasterrcnn_resnet50_fpn(weights="DEFAULT")
dataset = PennFudanDataset('data/PennFudanPed', get_transform(train=True))
data_loader = torch.utils.data.DataLoader(
    dataset,
    batch_size=2,
    shuffle=True,
    num_workers=4,
    collate_fn=utils.collate_fn
)

# For Training
# Dataloader返回的是我们定义dataset时定义的__get_item__函数返回类型的列表
images, targets = next(iter(data_loader))
images = list(image for image in images)
targets = [{k: v for k, v in t.items()} for t in targets]
output = model(images, targets)  # Returns losses and detections
print(output)

# For inference
model.eval()
# 生成随机图片,两张,用来推理
x = [torch.rand(3, 300, 400), torch.rand(3, 500, 400)]
predictions = model(x)  # Returns predictions
print(predictions[0])
print(predictions[1])
训练代码
这里是核心的训练部分。
from engine import train_one_epoch, evaluate

# train on the GPU or on the CPU, if a GPU is not available
device = torch.device('cuda') if torch.cuda.is_available() else torch.device('cpu')

# our dataset has two classes only - background and person
num_classes = 2
# use our dataset and defined transformations
dataset = PennFudanDataset('data/PennFudanPed', get_transform(train=True))
dataset_test = PennFudanDataset('data/PennFudanPed', get_transform(train=False))

# split the dataset in train and test set
# 用randperm打乱编号,划分训练集和测试集
indices = torch.randperm(len(dataset)).tolist()
dataset = torch.utils.data.Subset(dataset, indices[:-50])
dataset_test = torch.utils.data.Subset(dataset_test, indices[-50:])

# define training and validation data loaders
data_loader = torch.utils.data.DataLoader(
    dataset,
    batch_size=2,
    shuffle=True,
    num_workers=4,
    collate_fn=utils.collate_fn
)

data_loader_test = torch.utils.data.DataLoader(
    dataset_test,
    batch_size=1,
    shuffle=False,
    num_workers=4,
    collate_fn=utils.collate_fn
)

# get the model using our helper function
model = finetune.get_model_instance_segmentation(num_classes)

# move model to the right device
model.to(device)

# construct an optimizer
# stochastic gradient descent
params = [p for p in model.parameters() if p.requires_grad]
optimizer = torch.optim.SGD(
    params,
    lr=0.005,
    momentum=0.9,
    weight_decay=0.0005
)

# and a learning rate scheduler
# 这里定义的是学习率的更新,可以看这里https://zhuanlan.zhihu.com/p/344294796
# StepLR是等比数列式的更新方式。同样还有线性的LambdaLR等等...
lr_scheduler = torch.optim.lr_scheduler.StepLR(
    optimizer,
    step_size=3, # 3个epoch更新一次
    gamma=0.1
)

# let's train it just for 2 epochs
num_epochs = 2

for epoch in range(num_epochs):
    # train for one epoch, printing every 10 iterations
    train_one_epoch(model, optimizer, data_loader, device, epoch, print_freq=10)
    # update the learning rate
    lr_scheduler.step()
    # evaluate on the test dataset
    evaluate(model, data_loader_test, device=device)

# 这里保存模型参数
torch.save(model.state_dict(), 'mymask.pth')
print("That's it!")
推理代码
这里的代码将存储的模型参数代入模型推理并进行可视化。
import matplotlib.pyplot as plt
from torchvision.utils import draw_bounding_boxes, draw_segmentation_masks

device = torch.device('cuda') if torch.cuda.is_available() else torch.device('cpu')
num_classes = 2
# get the model using our helper function
model = finetune.get_model_instance_segmentation(num_classes)
model.load_state_dict(torch.load('mymask.pth'))
# 如果出现RuntimeError: input type (torch.cuda.FloatTensor) and weight type (torch.FloatTensor) should be the same
# 则注释掉下一行。
model.cuda()

# image = read_image("data/PennFudanPed/PNGImages/FudanPed00016.png")
image = read_image("data/MyPic/1.jpg")
eval_transform = get_transform(train=False)

model.eval()
with torch.no_grad():
    x = eval_transform(image)
    # convert RGBA -> RGB and move to device
    x = x[:3, ...].to(device)
    predictions = model([x, ])
    pred = predictions[0]


image = (255.0 * (image - image.min()) / (image.max() - image.min())).to(torch.uint8)
image = image[:3, ...]
pred_labels = [f"pedestrian: {score:.3f}" for label, score in zip(pred["labels"], pred["scores"])]
pred_boxes = pred["boxes"].long()
output_image = draw_bounding_boxes(image, pred_boxes, pred_labels, colors="red")

masks = (pred["masks"] > 0.7).squeeze(1)
output_image = draw_segmentation_masks(output_image, masks, alpha=0.5, colors="blue")


plt.figure(figsize=(12, 12))
plt.imshow(output_image.permute(1, 2, 0))
plt.show()
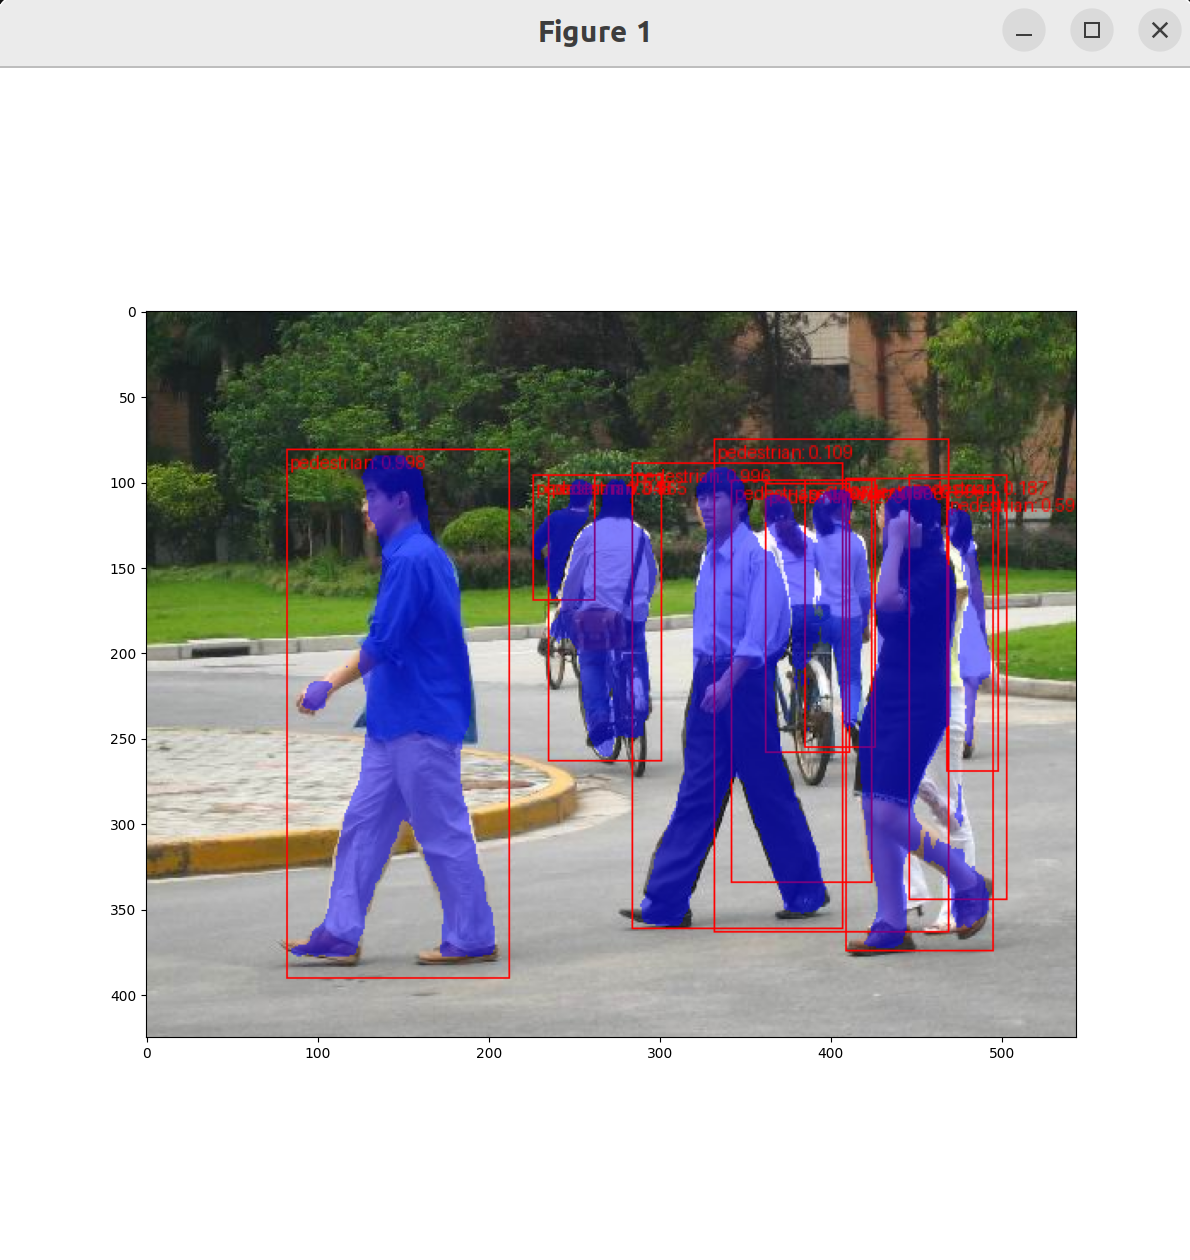
这样就大功告成了。代码仓库在这里。